Friday 20 June 2014

End-of-the-Year Gifts for Teachers

Hi everyone!!! It's been a LONG time since I posted last, but I'm excited to share a few small projects I created this past weekend. Being the end of my daughter's pre-school year, I wanted to show my appreciation to her wonderful teachers by making a fun way to give some Starbucks gift cards! With the help of Pinterest for inspiration...this is what I came up with!
PS: Ok...I have to toot my own horn here. I'm happy to say (heehee) I came up with the pun  "That's a f 'RAP'!" all on my own lol!!! The other one, "Thanks a Latte," I found and printed the labels from the
 internet :-) Gotta love corky puns right?!
Thanks for stopping by!!! :-)


Saturday 1 March 2014

Burlap Rose Wreath

Hi everyone 😁
I wanted to share my latest creation (inspiration...Pinterest). Be sure to checkout my new Facebook page LuvLee Creations https://www.facebook.com/luvleecreations

Completed Shabby Chic Bed!!!

Hi everyone! I'm so excited to finally finish my bed! After a LONG, daunting process...the end results are fabulous! First was the stripping, then sanding, then black paint under coat, then chalk paint (Annie Sloan Chalk Paint - Old White), then distressing (180 grit sandpaper) and finally...clear and dark wax 😄 
Thanks for stopping by!
PS: to stay updated with my home decor and furniture projects, be sure to follow my new Facebook page: Luvlee Creations https://www.facebook.com/luvleecreations


Saturday 22 February 2014

Vintage Music Sheet Wreath

Another quick project. I just had to make one of these vintage music sheet decor wreaths lol!!! Super fast and easy!!! All done during my son's nap! I'm loving it!!!


Thursday 20 February 2014

Quick, Cheap & Easy Home Decor Project!

Hi everyone!

I was once again inspired by Pinterest and started going crazy with Jute twine! This one was so much fun. I just bought some plastic pears from my local dollar store, got out my glue gun and twine...and PRESTO!!! Beautiful rustic decor. 

Next, I'm transforming styrofoam balls and vases 😁 
Happy creating everyone!
Hugz
Leanne


Thursday 13 February 2014

More Valentine Favors

And here are the valentine favors for my daughter's pre-school classmates. Rollos wrapped in yellow paper and pink for the eraser...with metal foil tape. A Hershey's kiss for the tip. Again...inspired by Pinterest! LOVE!

Wednesday 12 February 2014

Valentines Favors

Hey everyone!
Just a quick project post. I made some fun valentine favors for my daughter's pre-school teachers. Simply mason jars filled with v-day smarties, mini marshmallows and teddy grahams oh....and embellishing of course! So much fun. Love Pinterest!!! Lol! 
HAPPY VALENTINE'S DAY!!!


Friday 31 January 2014

Another Transformation

It's amazing what a little paint and distressing can do to a project! This cast iron table top candle chandalier started out a dark gold color (grrr I totally forgot to take a before picture!!!). It was in a much needed transformation! First, I spray painted it black, then off white and finished it by distressing with a fine grit sandpaper. Love this shabby chic transformation!!!

Friday 24 January 2014

Drab to Fab ~ Thrift Store Find ~ Home Decor Topiary


Once again (with Pinterest as my inspiration), I went on another treasure hunt at my local thrift stores. I found this Christmas Topiary Decor for 50% off (making it $3.75). I couldn't pass up the deal lol!!! I saw the vase and knew I wanted to use my Annie Sloan Chalk Paint (ASCP) and create a shabby decor piece for my home. I wanted to add a nice punch of lush green to give my space a bit of an organic feel. 


So, to start my makeover mission, the first thing I needed to do was pull out those terrible brown and gold sparkled leaves and shrubs. 


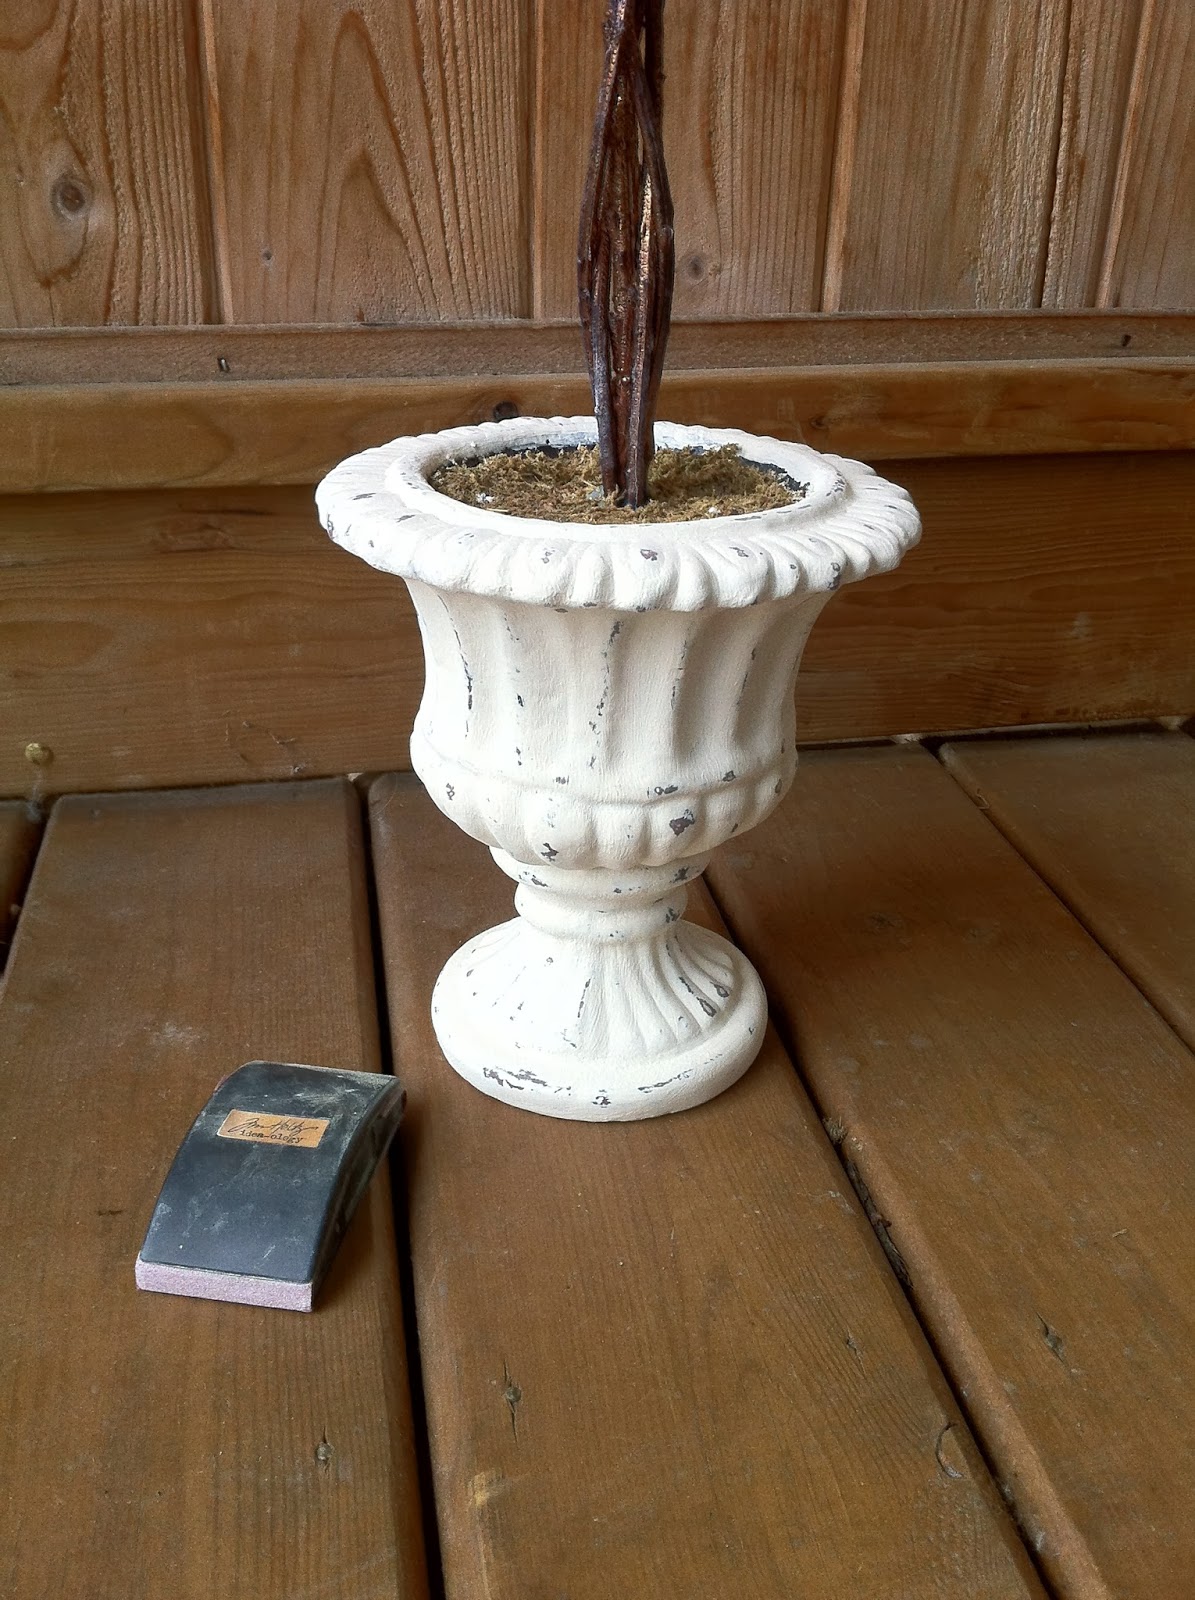
I cut the leaves off the top of the stem and twisted wire around the end to bundle the branch stubs and make a point (it made it easier to poke it into the Styrofoam ball). I left the moss that was originally in the vase because I knew I was going to be adding more moss over top of it.


Then I pulled out my ASCP in the color Old White. I LOVE this paint because you can paint almost anything with it and not have to prep your surface. I was going to do just one coat of paint, but then decided I wanted a bit more coverage.


Here is the 2nd coat of paint.


I then took some fine grit sandpaper (120) and sanded/distressed the raised areas...to give it an aged look.


Next, I gave it a coat of Annie Sloan Clear Wax and wiped it down really good to seal in the wax. I love the slightly dull sheen the wax gives.


To finish off the distressed look on the vase, I added some Annie Sloan Dark Wax. I applied it on fairly thick, then wiped it down with a rag. It was still pretty dark, so I took some ULTRA FINE steel wool and rubbed off the wax a bit more. The pics don't really do it justice, but you can really see the difference the dark wax makes.


Next, I went to my local dollar store and picked up a 6 inch Styrofoam ball, moss and greenery (these were called "mini Eucalyptus branches"). There are 5 branches showing in this pic, but I ended up going back and buying the last 3 they had in stock.


I painted the foam ball with a mixture of green and dark brown (which I created by adding a bit of black to the brown I already had). I just used some cheap dollar store acrylic paints from my stash. Painting the ball helped to camouflage the ball underneath the branches. 


Then I cut the little branches off the main branch and bent the wire stems at a 90 degree angle and pressed them into the ball. 


I added a bit of hot glue for reinforcement. If you're not careful, the hot glue can melt the plastic branches and sometimes the foam ball...but I still like to use it because it's quick drying (I'm on a major time crunch being a mommy of two lol). I just blew cool air on the glue, after it was applied, to avoid a major meltdown. It worked just fine :-)


Ok, so after adding all the mini Eucalyptus branches I had...I still wanted more coverage...and since I bought out all the branches at my one dollar store nearest to me, I went hunting for more. I couldn't find the exact ones...but I did find these ones (shown in the pic above) at a different dollar store. The leaves are a bit smaller...but fuller...I really like the contrast it gave to the finished product.


I gave the ball of greenery a bit of a trim...and presto!!! It looks so real!!!


Finally, I added some glue over top of the moss that was already on the vase, then added more moss to give it a fuller look.


Finished product!!! An awesome topiary decor piece for my home. Super quick and easy...and CHEAP! You can bet I'll be making more of these (in different sizes and some without the branches/stems...just the ball and vase). I love these!!!


Thanks for stopping by everyone!!! Happy creating!!!
Hugz :-)


Thursday 16 January 2014

From Trash to Treasure!

Hello everyone!!!

I know it's been FOREVER since I last posted an update, but things are crazy busy (or should I say more busy) since I became a mommy of two.

After numerous bugs tore through our household during the holidays, making everyone sick, I finally got the energy to get creative again!!! My inspiration...a combo of Pinterest and my daughter's broken jewelry (given to her from her dear GG - Great Grandma - who recently passed away). The necklaces were in decent shape until my 3 year old daughter got her hands on them lol! I wanted to restore them back to their beauty and create something special. So...I took this now broken memorabilia from dear GG and added a few trinkets and vintage lace from my stash...and presto...a super shabby chic chunky necklace. My daughter (although too young now to wear it) LOVES it!!! So for the time being, I plan to wear it and then pass it down to her once she is old enough ;-) 

Thanks for stopping by!

Hugz :-)


Monday 9 September 2013

Update!!!

Hi my friends!!! 
So sorry it's been a long time since I've updated my blog. As some of you know...I have just recently given birth to my wonderful son. Things didn't go as planned due to complications, however...we are both ok and recovering well. 
Life has just become even more busy for me as I learn how to adjust from having just a 3 year old...to now having a newborn and a 3 year old. Boy it's not easy...but I wouldn't trade it for the world!!! 
I just wanted to say THANK YOU to all of you who continue to follow me...even though I'm not crafting much right now. Believe me...I will get back in the saddle one day...when my life isn't so hectic lol!!!
Love you all!
Hugz
Leanne

Saturday 13 July 2013

Flower Girl Accessories for my Daughter

Hey everyone!!! I know I've been MIA for a while...as I've been busy preparing for the birth of my son (3 weeks till due date!!!). I'm excited to share a few items I've been working on for my daughter. She will be the flower girl at my brother-in-law's weeding next weekend.
 
First, I altered a plain aluminum/metal pail to look rustic/shabby chic (to go with the wedding theme). The wedding colors are sage green and ivory.
 
Then, I created a shabby chic headband and added handmade flowers to some super cute sandals. I can't wait to see my daughter all dressed up!!!
 
Thanks for stopping by!!! Miss you all :-)